 I blinked. The ceiling was covered in green smoothie. The walls were covered in green smoothie. The floor was covered in green smoothie. I was covered in green smoothie.
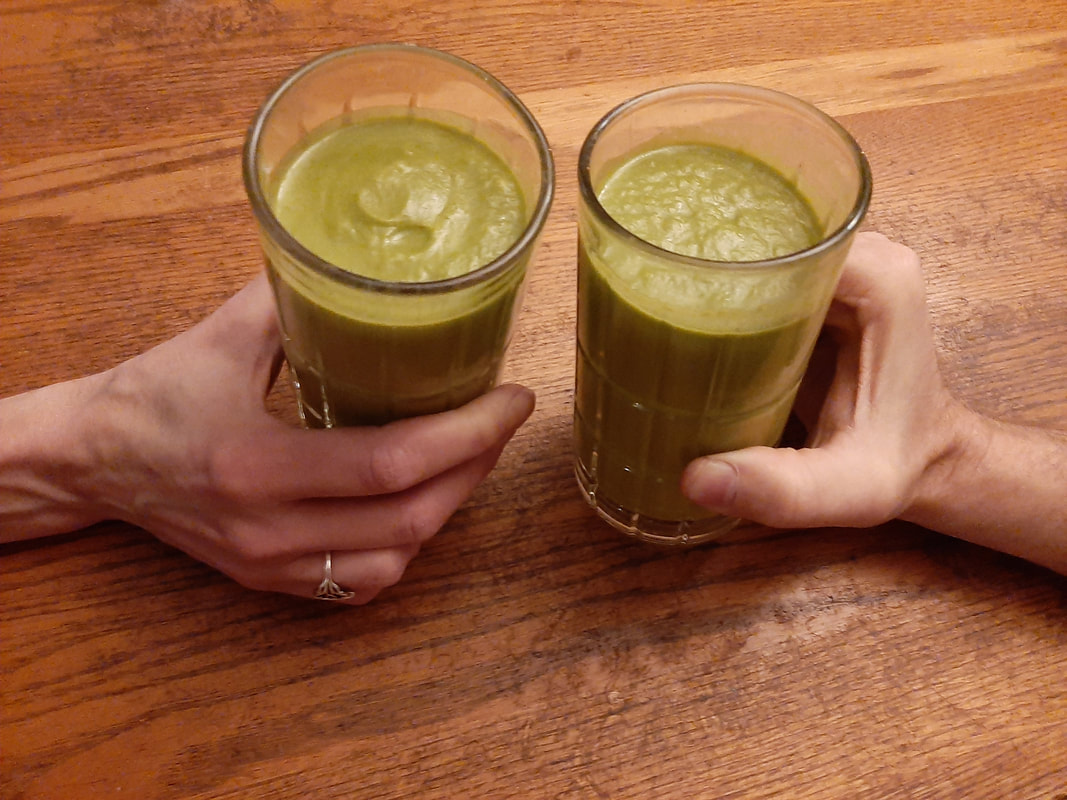
Apparently, I hadn't fully secured the lid onto the blender, and in the process of blending my smoothie, the lid had flown off, spattering splotches of green smoothie everywhere. Uh, oh. Thus began my journey of drinking green smoothies 6 years ago. Hopefully, you'll blend one too after reading their benefits and my recipe. The Benefits of Drinking Green Smoothies Green smoothies up your vegetable intake. I easily consume about 3 cups of vegetables each morning in my smoothie. Green smoothies are "fast food." It only takes about 10 minutes to make a smoothie. It's an easy way to ensure a healthy meal on a busy day or when your energy levels are low. Green smoothies are easy to digest. Since all the vegetables are blended, they are easier on the stomach. For a year in my illness, all I could eat were smoothies and pureed food. Green smoothies are high in fiber. Fiber forms bulk in your colon and helps bind and excrete toxins and inflammatory mediators. Green smoothies can aid in weight loss. The fiber in green smoothies makes them very filling, and they are low in calories. Green smoothies are more economical than juicing. With green smoothies, you're blending the whole vegetable, vs juicing where the fiber is removed. With smoothies, nothing is wasted, and you won't have to buy as much produce. How to Make a Green Smoothie Buy a quality blender. Originally, we bought a NutriBullet, but the motor failed after just a few months. Now we own a VitaMix. It's expensive, but it blends beautifully, is long lasting, and comes with a warranty. Start with a liquid base. I use 2 cups of filtered water for making a smoothie that blends to the 5.5 cup line. You could also use green tea, almond milk, etc. for your base. Use more or less liquid to adjust the thickness of your smoothie. Use plenty of organic vegetables. I use about 3 cups of vegetables, including lettuce, kale, celery, cauliflower, broccoli, zucchini, and carrots. Mix and match vegetables to find what tastes best together. Include nuts, seeds, or peanut butter. These will make your smoothie more filling and give you fat and protein. Use fruit sparingly. Try to limit the amount of fruit in your smoothie and use lower glycemic options like apples and berries. Sugar, even sugar from fruits, feeds yeast and bacteria in the body. I often only use half of an apple in my smoothie. Add ice. Green smoothies are more palatable when they're cooler. I blend 6 ice cubes into my smoothie. And, yes, make sure the lid is secured onto your blender. Need I say more? Now I'm off to drink a green smoothie. Will you join me?
2 Comments
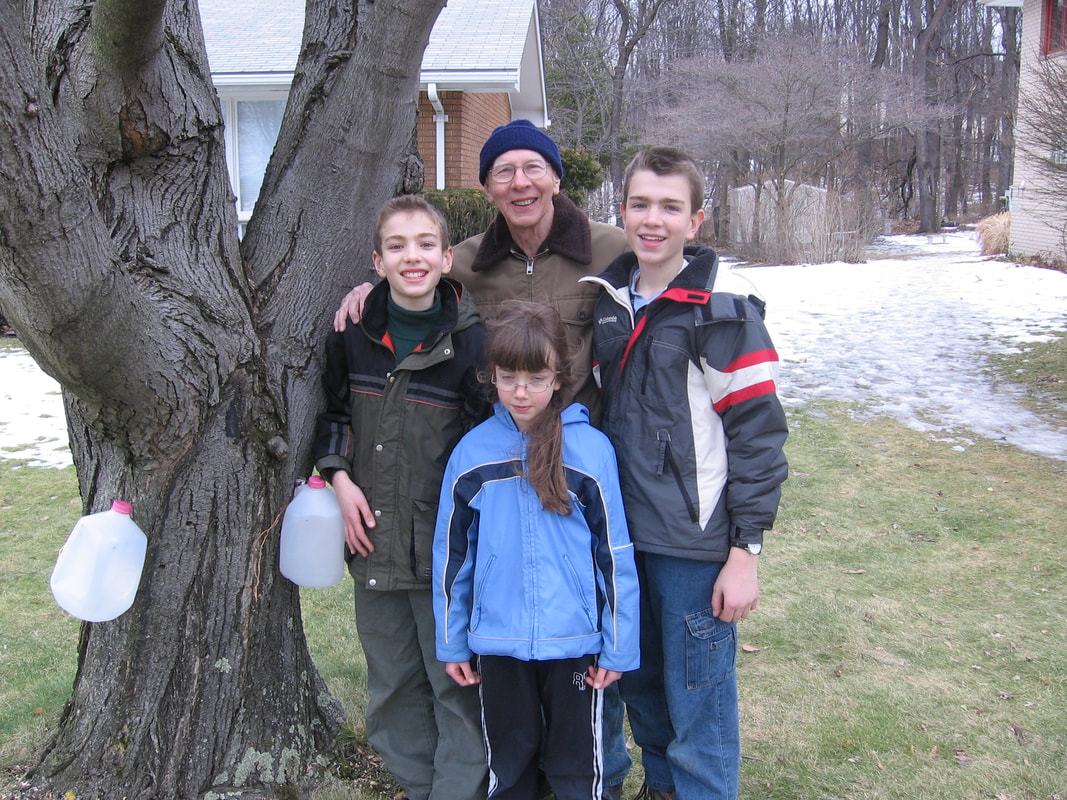 Tapping at a neighbor's tree in 2010. It's maple tapping season! With the temperatures above freezing during the day and below freezing at night, the sap is running in the trees, and it's time to make syrup. Each year from around 2000 - 2015, my family would head outside with a drill, taps, and 5 gallon buckets (in the early years, we used milk jugs), and we would tap our and our neighbors' maple trees. This year, after a 5 year break, we are repeating the project! Do you want to join us? Using a 19/64" drill bit, drill a hole about 3' from the bottom of your tree and go in about 2" deep. Drill at a slightly upward angle to facilitate the downward flow of the sap from the hole. Then insert a tap with the tubing entering into a small hole in the lid of your 5 gallon bucket and secure the bucket to your tree using bungee cords. 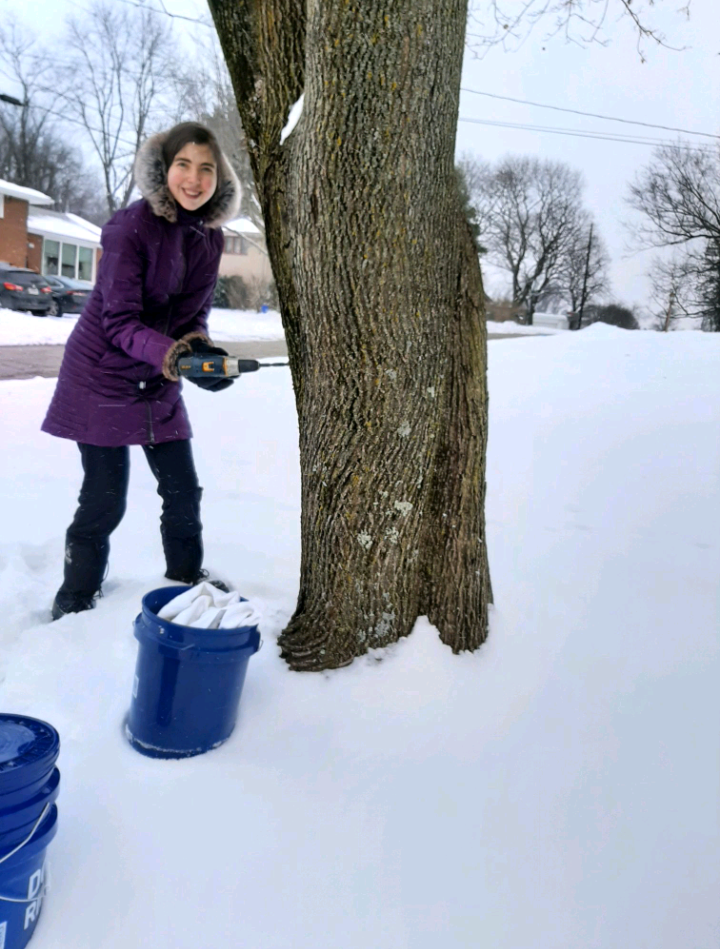 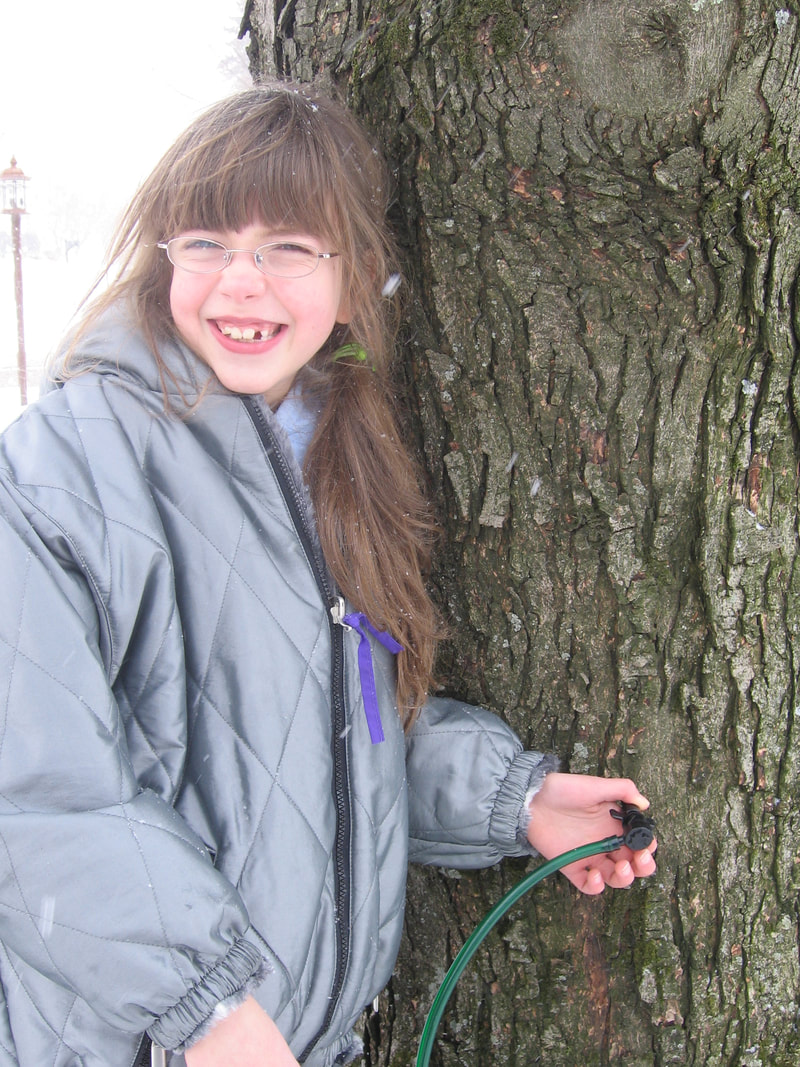  Although sugar maples are the best for producing syrup due to their high sugar content, any type of maple tree will work. The tree must be at a minimum of 12" in diameter to place 1 tap, and if it has a diameter of more than 20", it can take 2 taps. On a good day, we might collect about 3 gallons of sap from 1 tree and only a quart the next. The amount all depends on the weather. It takes 40 gallons of sap to make 1 gallon of syrup, and each tree gives about 10 gallons of sap per season. As your buckets become full, collect the sap, dump it through a cheesecloth filter to remove any sediment, bugs, or twigs, and store your sap in a large pot placed in a snowbank outside to keep it cold. Once you have enough sap, begin boiling it down at a temperature of 212° F. As the sap thickens into syrup, use a candy thermometer to check the temperature and remove it once it reaches 219° F. Unfortunately, we've gathered very little sap this year as we mistakenly used a larger drill bit when tapping a week ago, but on Sunday, my oldest brother and his fiancée collected what sap was available, boiled it down, and received 1/4 cup of maple syrup. We'll continue to collect sap as long as the temperature is above freezing during the day and below freezing at night. 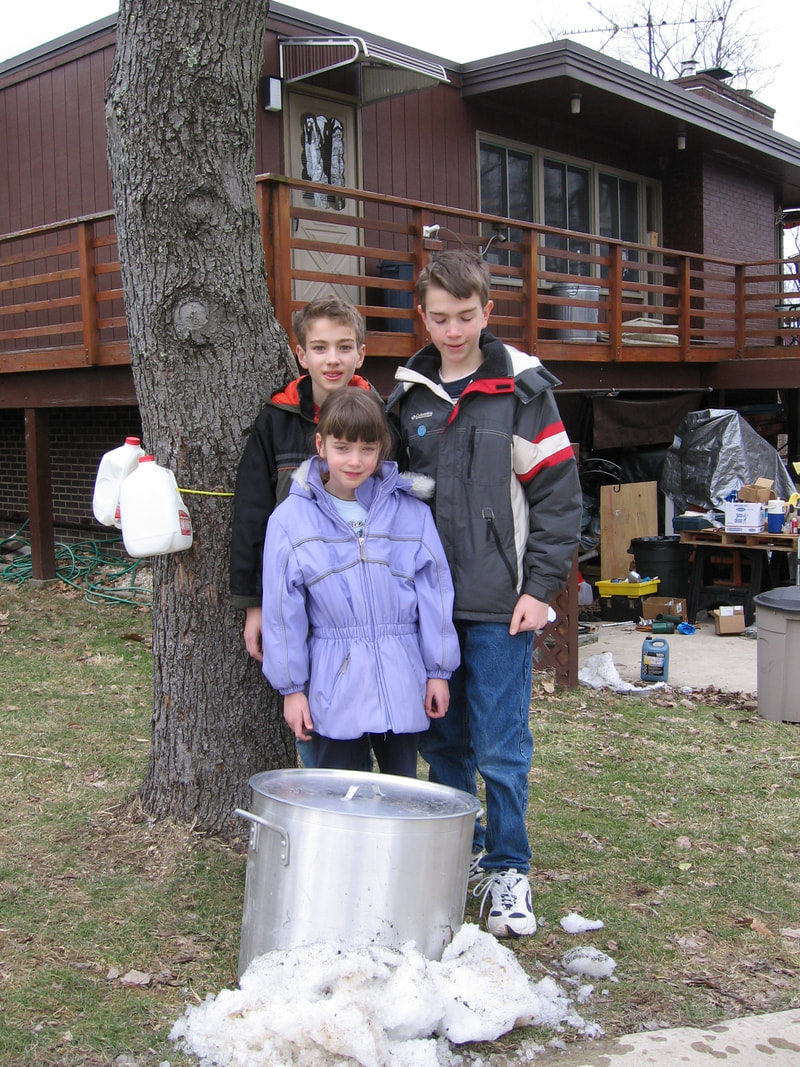 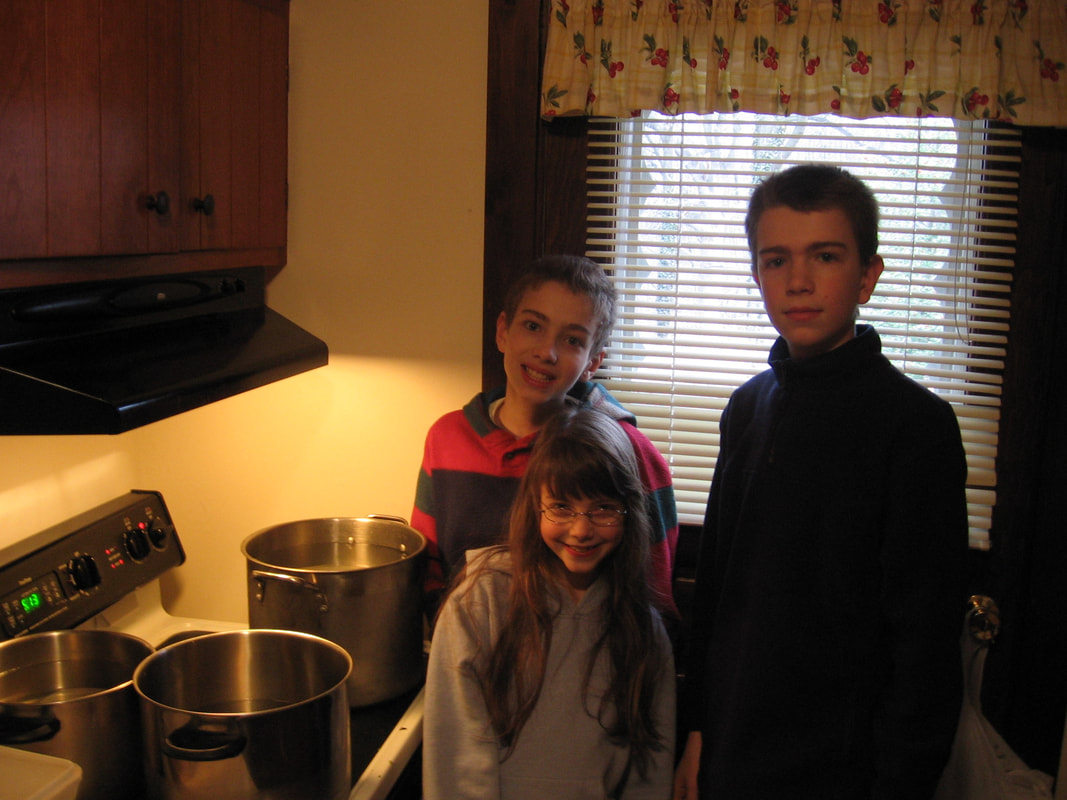 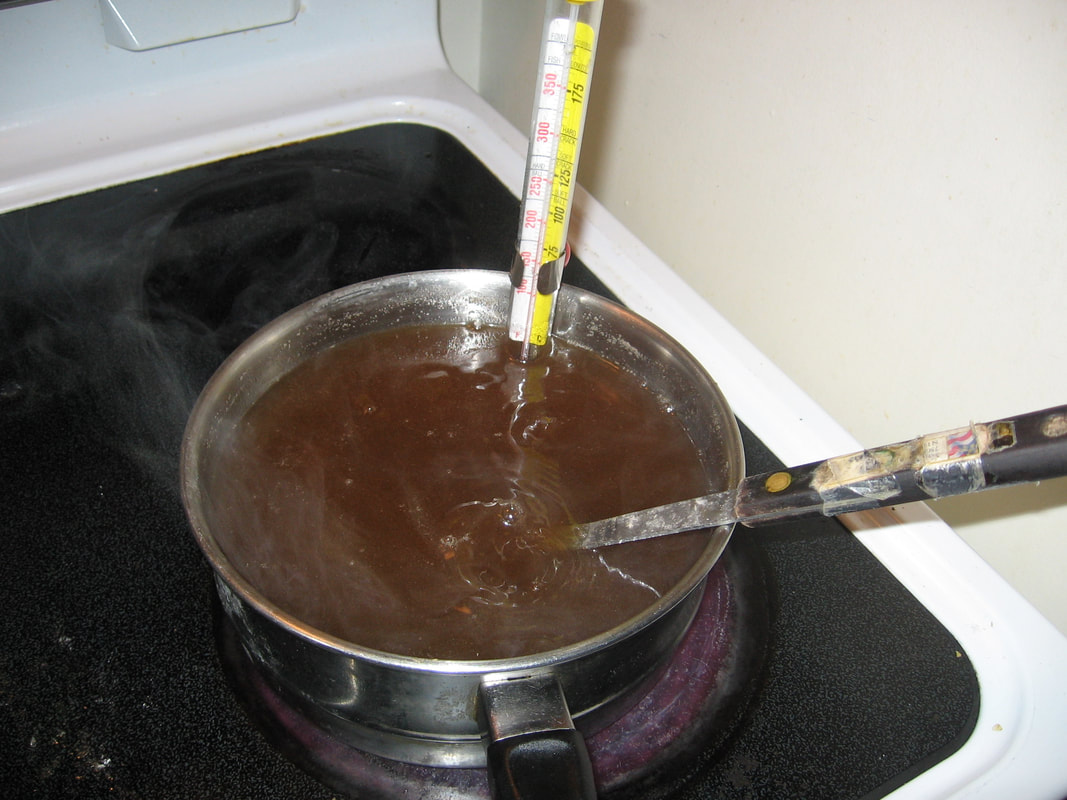 Drilling holes into trees. Trudging through the snow to collect sap. Boiling it down. Sticky fingers. This is maple season.
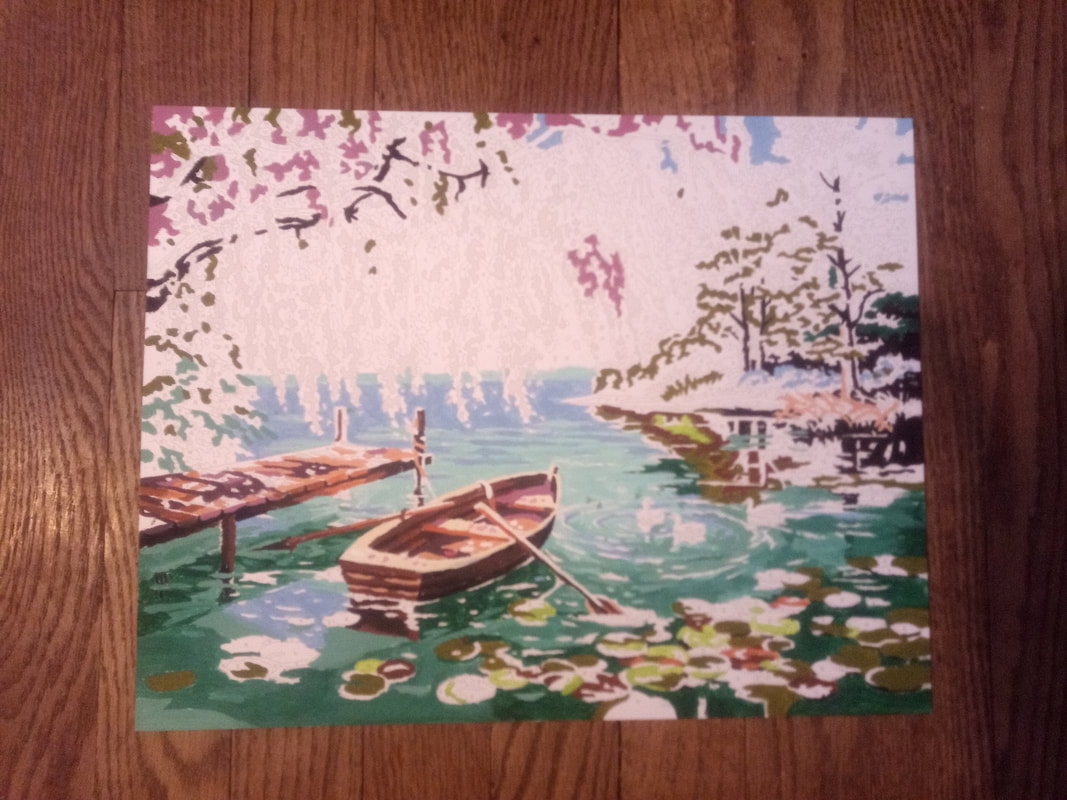
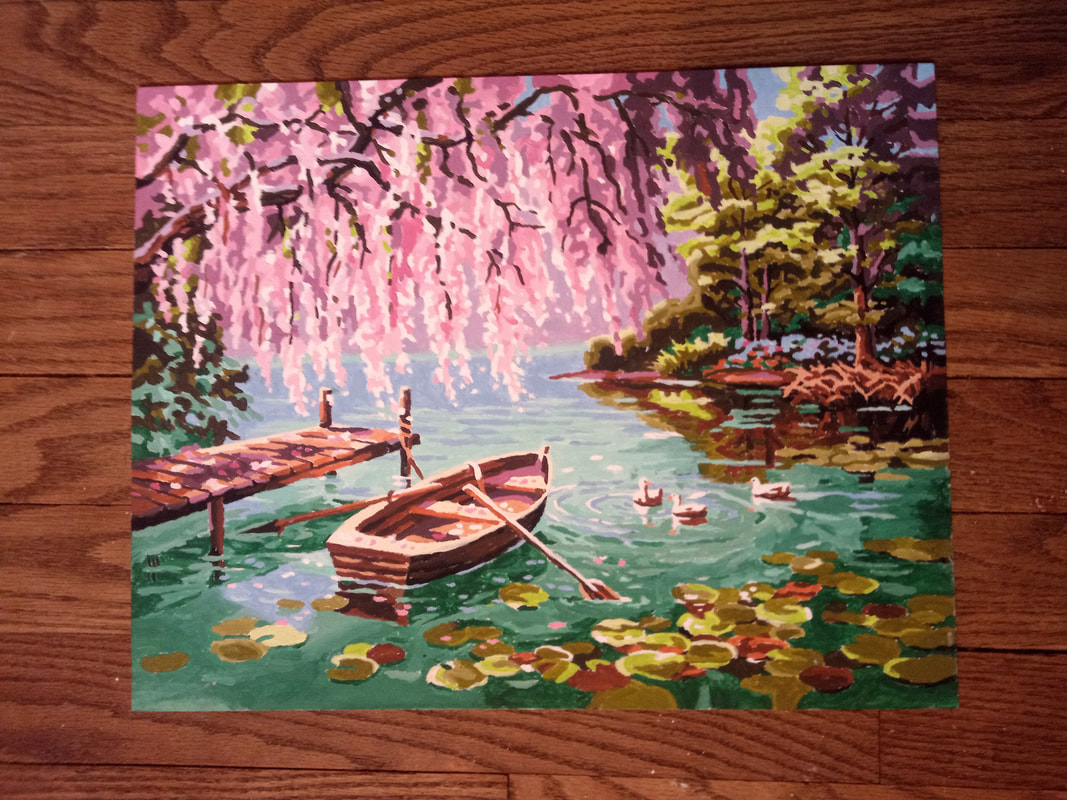
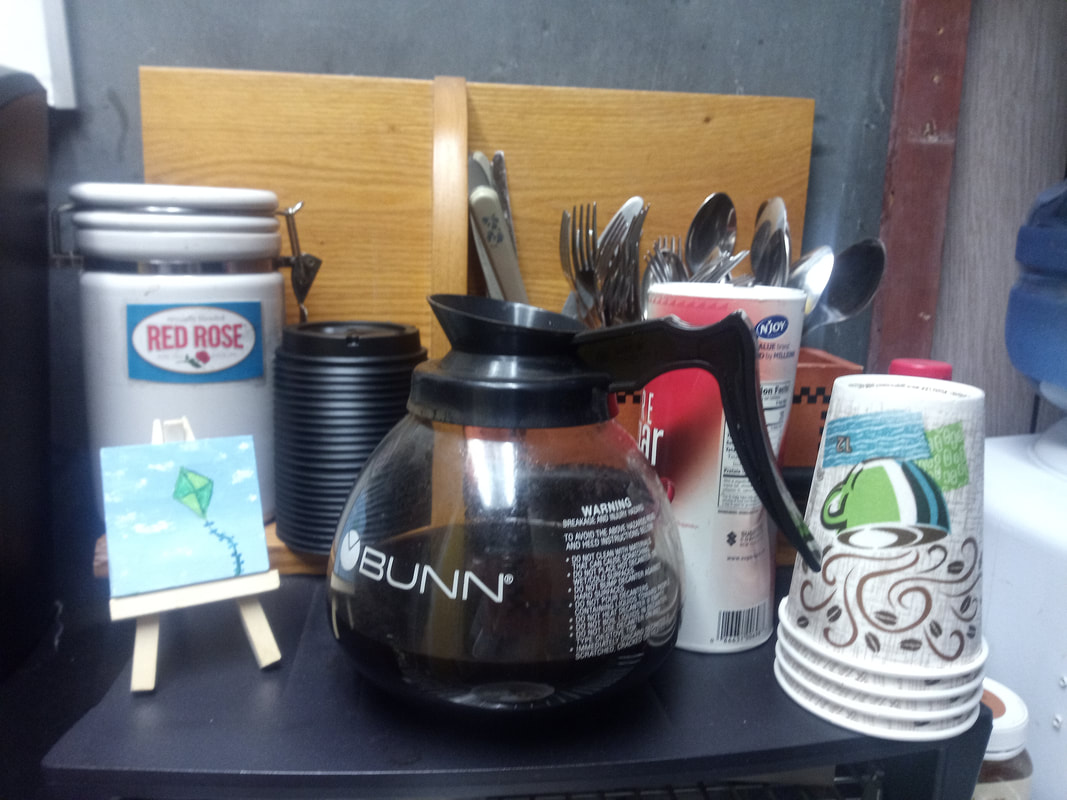
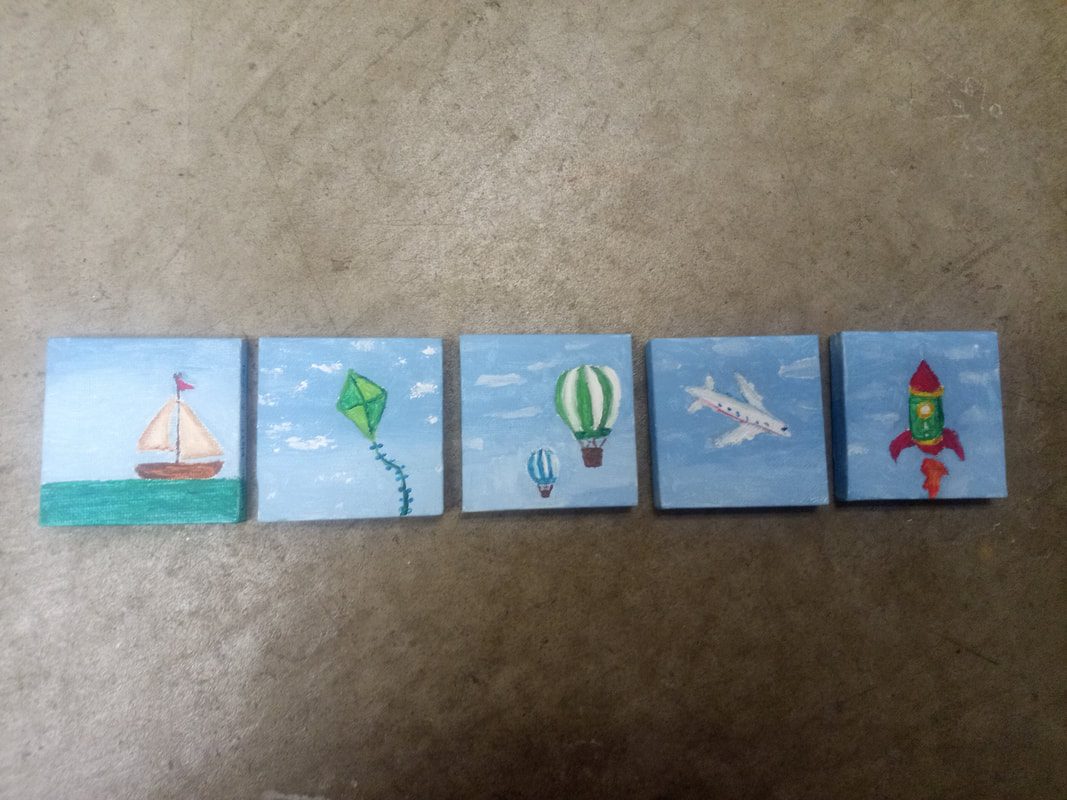
Special thanks to Randy Morris from Morris Organic Farm in Irwin, PA for his giving us taps years ago. He is currently making syrup that will be available for sale. 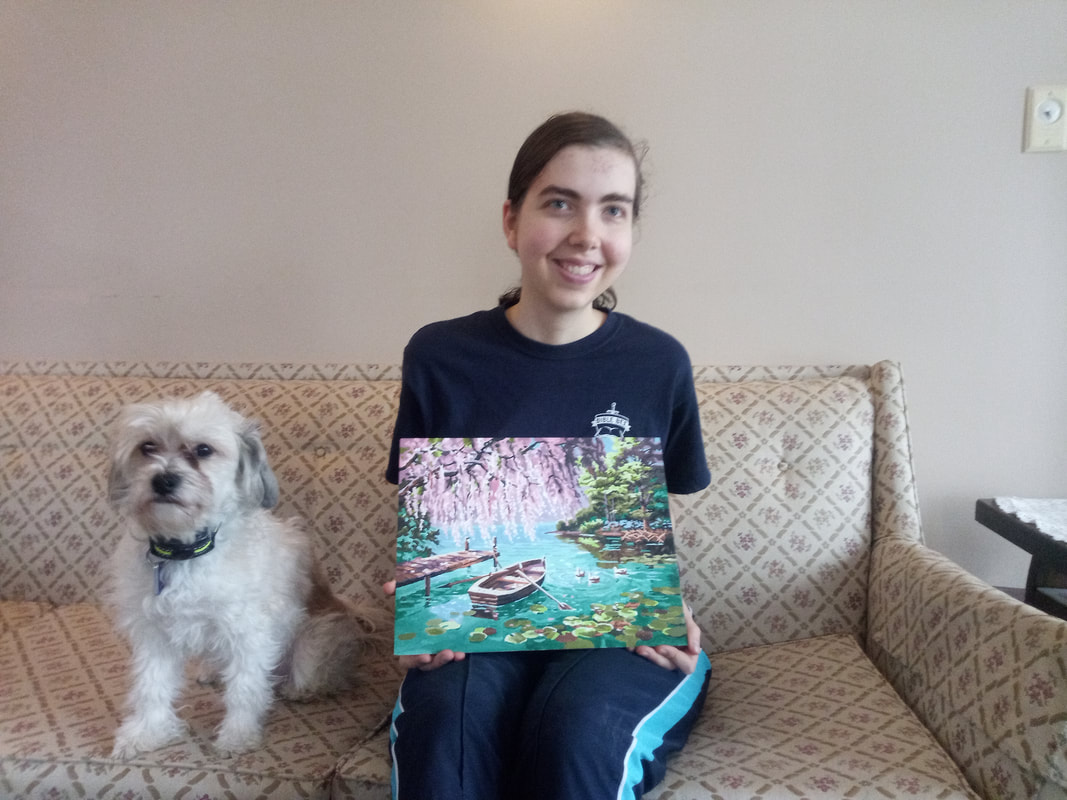 Me with my painting and my dog. Apparently, he didn't want to miss the photo opp. :) "This is for you to paint when you feel up to it," my friends said, as I unwrapped an acrylic paint by number kit. For a year, it sat in my closet, until this month, when my symptoms finally lessened enough to allow me to pick up my brush. The painting took about 20 hours to complete, but I loved every minute of it. I had found something I could do even when I was too foggy to read, my throat hurt, and my body ached. Once I was finished with the painting, I knew it was only the beginning of my journey of painting with acrylics. They dried fast. They weren't very messy. They didn't require much clean-up or set-up. I could easily put them away when I needed to rest. A few days after I finished my paint by number, my dad came home from Walmart. "I bought some mini 2"x2" canvases," he said. "I'd like you to paint 5 for each day of the work week to display by the employee coffee pot. I'll put out a new canvas out each day--that's how they'll know the coffee is fresh." We brainstormed what I should paint. Eventually, we decided on a sailboat for Monday, a kite for Tuesday, hot air balloons for Wednesday, a plane for Thursday, and a rocket for Friday. Our logic for the order of the paintings? You start at ground level and "sail into the week," then you go higher and higher into the sky until Friday, when, boom, the rocket takes off. I used a pencil to lightly sketch an outline onto each canvas and then painted the pictures. These mini canvases are sold with magnetic backings, so I plan on making some as gifts that people can put on their refrigerators.  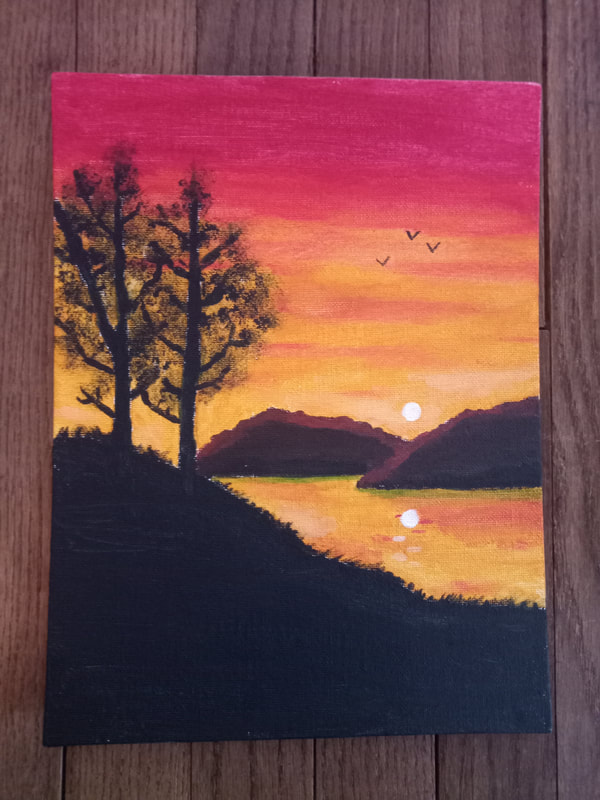 Here are a few more paintings I've done this month. I copied the snowmen from a Christmas gift bag and the sunset from an oil painting I'd done years ago. If you're looking to learn to paint and live in Westmoreland County PA, I highly recommend the Norwin Art League, where I learned to paint with oils years ago.
Do you paint with acrylics? What tips can you share? Where do find inspiration for your art?  “This is like running a marathon,” my specialist said, as I left my appointment for the 5 hour drive back home. And he was right. Traveling with a chronic illness is no small feat. Due to the severity of my illness, I am mostly homebound and rarely leave for anything besides a medical appointment. When I do make a medical trip, it takes much planning in advance and is taxing on my low energy levels. Still here are some tips that make traveling possible. Don't make any major treatment changes before traveling. Because many treatments make me feel worse initially, I avoid making any major changes to my protocol for at least a week before traveling so I am as stable as possible. Don't do all the travel in one day. My parents and I always leave the day before my appointment and sleep overnight so the trip is less exhausting and so we are fresher for the doctor. We then drive home the day of the appointment. Get as comfortable as possible in the car. Often, I’ll sit in the passenger seat opposed to a back seat so I have more leg space and can recline. I wear light colored clothing to stay cooler, use a small pillow for my back, and wear sunglasses to prevent headaches from the direct sunlight. When I was extremely light and sound sensitive, I wore a sleep mask, earplugs, and earmuffs to block out as much light and noise as possible. Pack all necessary medical supplies and assistive devices. I bring all my regular medication and supplements, dose my cortisol medication at higher amounts to cope with the stress of traveling, and pack “emergency remedies”--ginger tea for nausea, TriOral Electrolyte Powder for dehydration, and Alka-Seltzer Gold for herxing. I bring ice packs, as I often run fevers. In the past, I have even packed my own bedding and an air purifier to run in our hotel room, as I was at risk for severe reactions to even the scent of dryer sheets. When I was extremely weak, I used my wheelchair. Plan and cook meals in advance. Both my mom and I have very restrictive diets, there’s no such thing as a “cheat day” for us, and we cannot eat in restaurants. Before any trip, my mom creates a menu, and the day before we leave, she spends hours in the kitchen steaming vegetables, preparing meat, making hard-boiled eggs, cooking gluten-free grains, etc. She then packs the food into dishes labeled for each meal and loads them into a cooler. In the past, she also had to puree my food before packing it due to my severe digestive issues. Bring plenty of water and snacks. I'm always tired, and I try not to add to my fatigue with dehydration or blood sugar crashes. Often, I'll snack on nuts, apples, and raw vegetables. Flying with a chronic illness is more challenging, but it can be done, as my family proved in 2014, when we traveled to the Grand Canyon. At this time, I was still generally healthy and only had to avoid sugar, but my mom was on a very restrictive diet due to her autoimmune illness. Before we left for our trip, we planned a menu for each of the four days we were vacationing and created a list of groceries that accommodated my mom’s diet to buy once we got off our flight. Of course, we needed a way to cook, so we packed my dad's bag with a George Foreman Grill, an electric hotplate, jumper cables, and an inverter so that we could cook off the battery of our rental car. 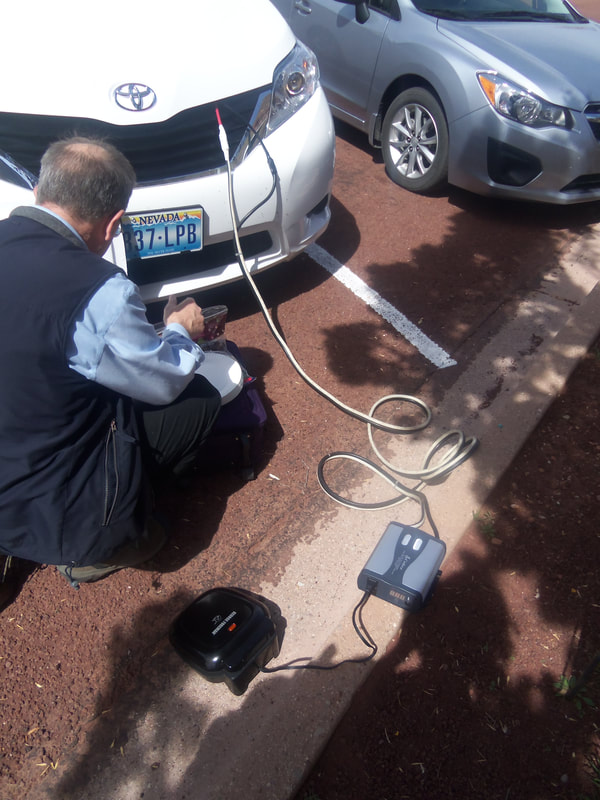 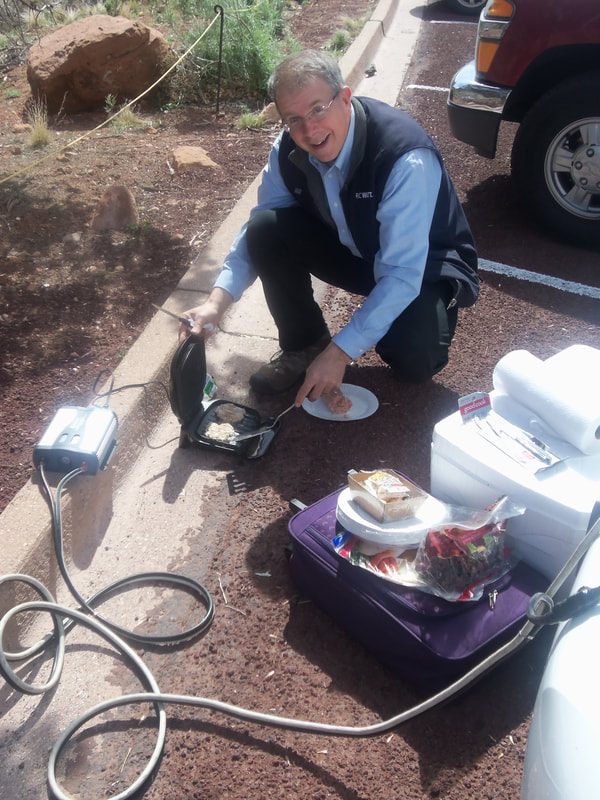 Finally, "go with the flow." On that Grand Canyon trip, airport security made my dad unload his bag, as all his gear looked suspicious, and he had to show his driver's licence a second time. We had to really "go with the flow" when we got off our flight, and Dad realized his driver's licence was still with the TSA agent. How would we get our rental car? How would Dad fly home without his driver's licence, which served as his photo ID?
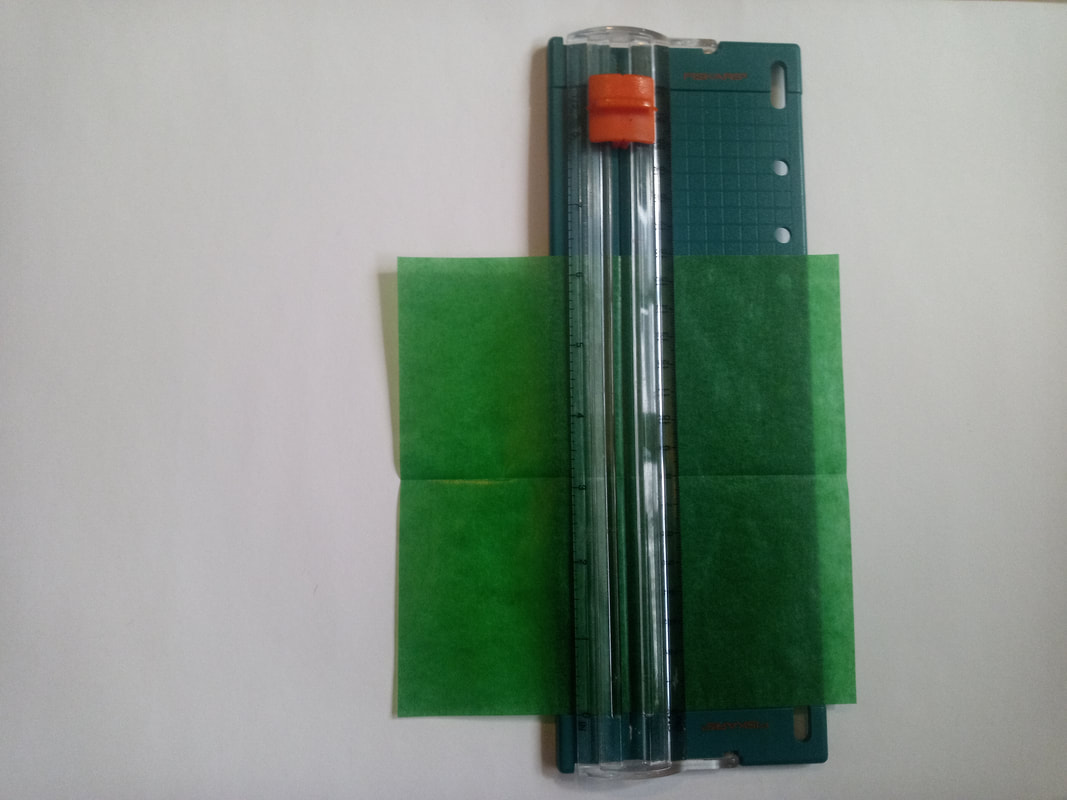
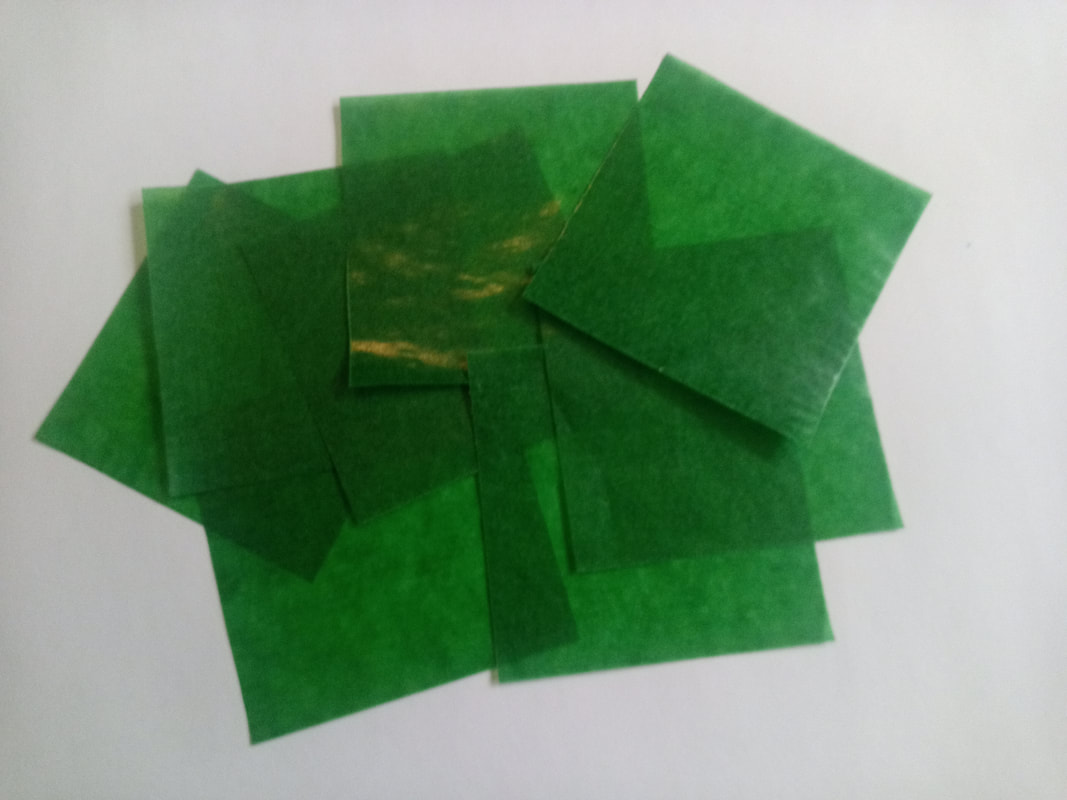
Ended up we registered the car in Mom's name. Flying home was a bit more tricky. We had been assured by the airport that if Dad just showed his credit cards, they'd let him through security, but you guessed it, that didn't work. Dad was held up at the gate, emptying his wallet and searching for identification with either his address or Social Security number. Just as the TSA agent was telling my family to fly home without him, Dad pulled out an old Red Cross card that had his Social Security number, and he was "saved by the blood!" So there you have my tips. Traveling with a chronic illness is difficult, but it can be accomplished.  Would you like to brighten your window? Today I'll show you how by making a pinwheel suncatcher. Supplies: 2 sheets of Kite Paper Paper Cutter Elmer's Re-Stick Glue 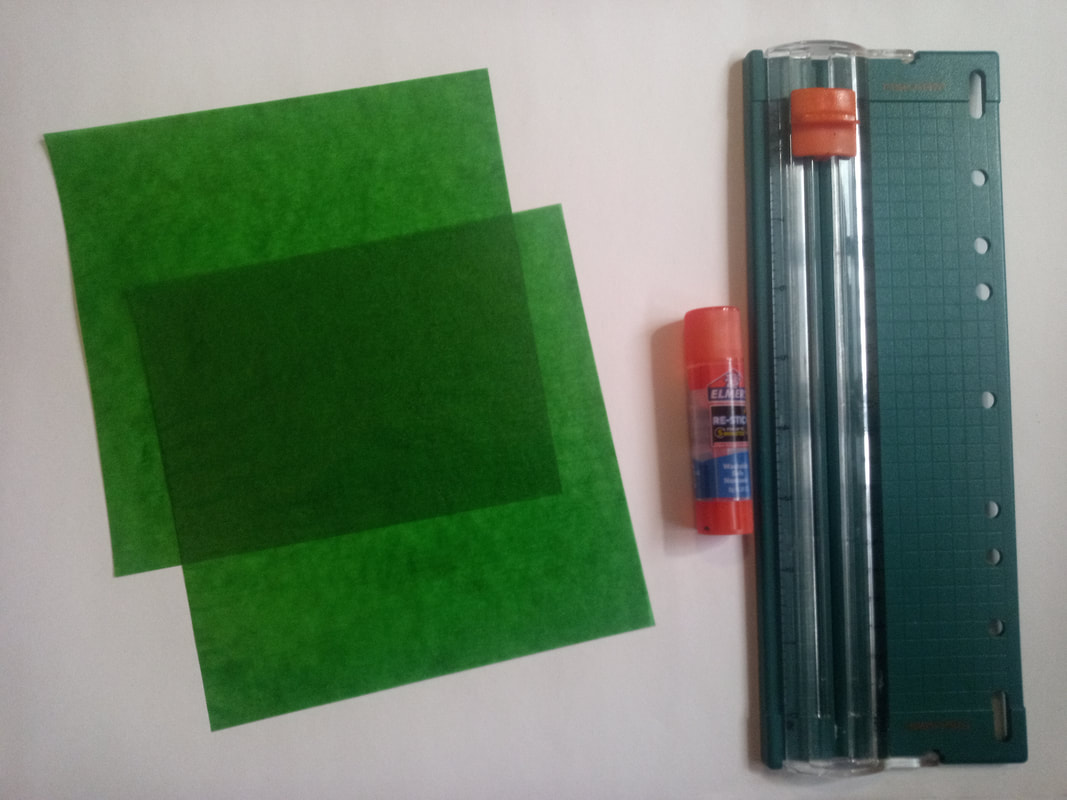 To begin, fold your two sheets of kite paper in half horizontally. Unfold and then fold each sheet in half vertically. Use your paper cutter to cut along the creases. After cutting both sheets, you should have eight squares. Take one of your squares and holding it at a diagonal, fold it from side to side. Then unfold to make a center crease. 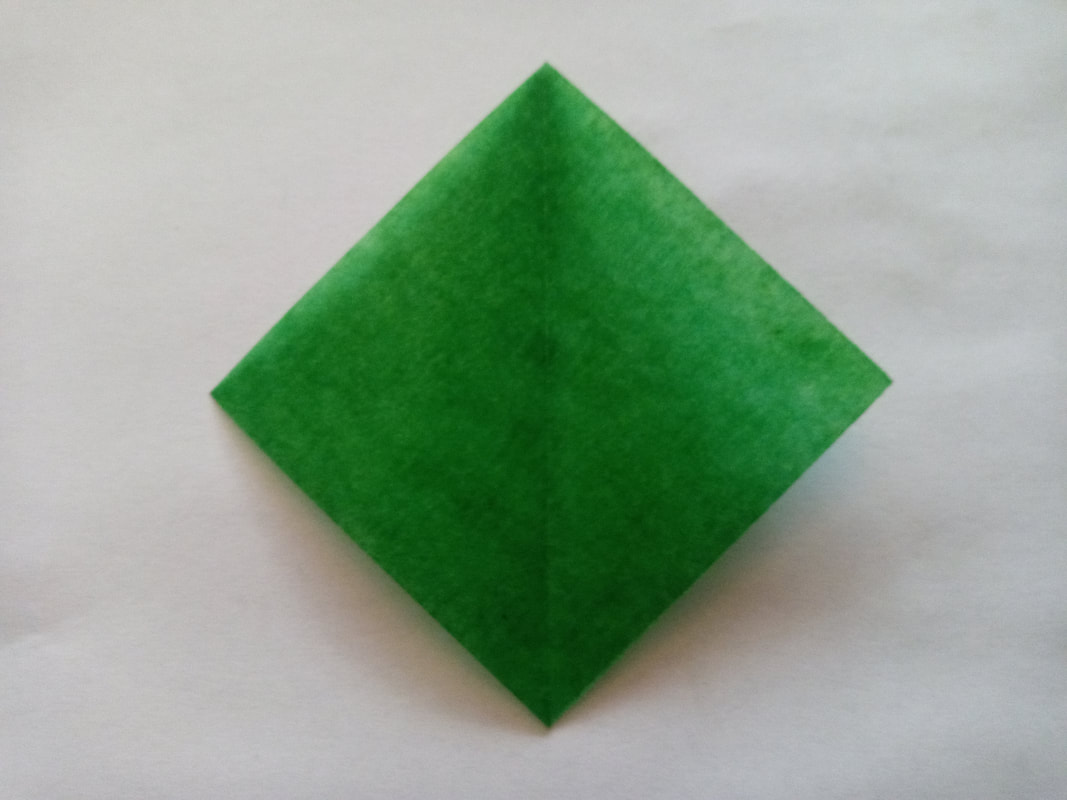 Next, fold the the two side triangle tips toward the center crease and glue in place. 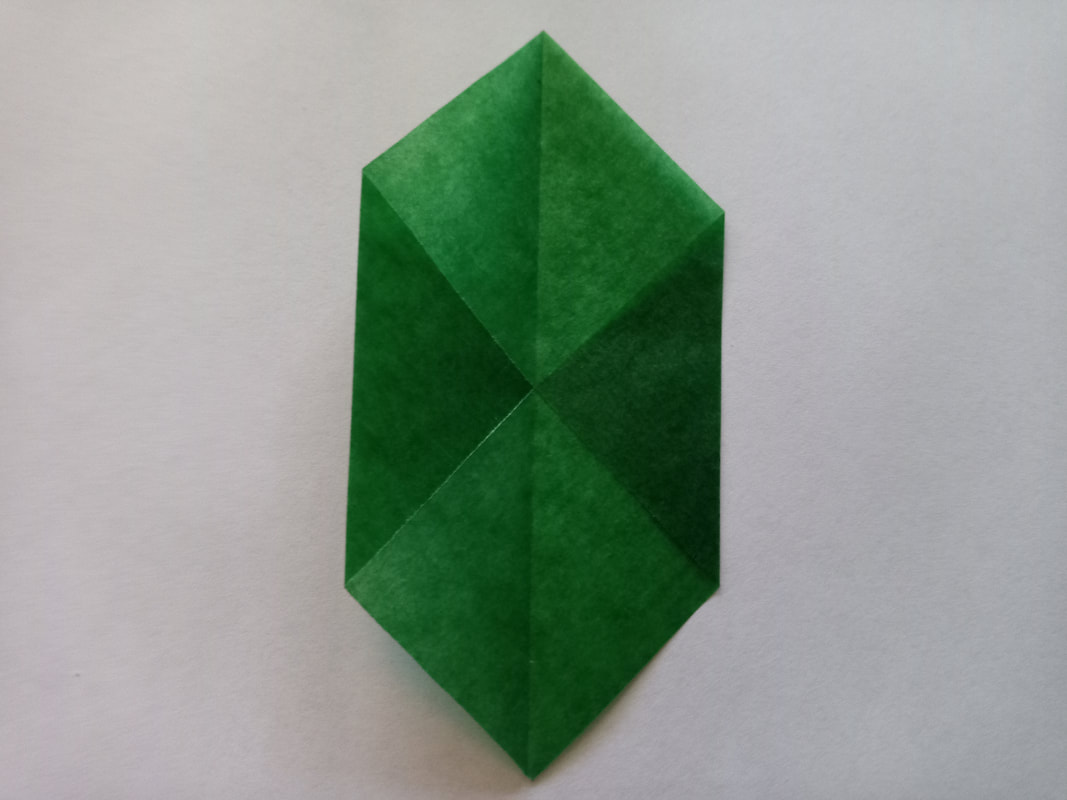 Then fold the two upper sides in and down towards the center so they meet along the center crease. Glue in place. 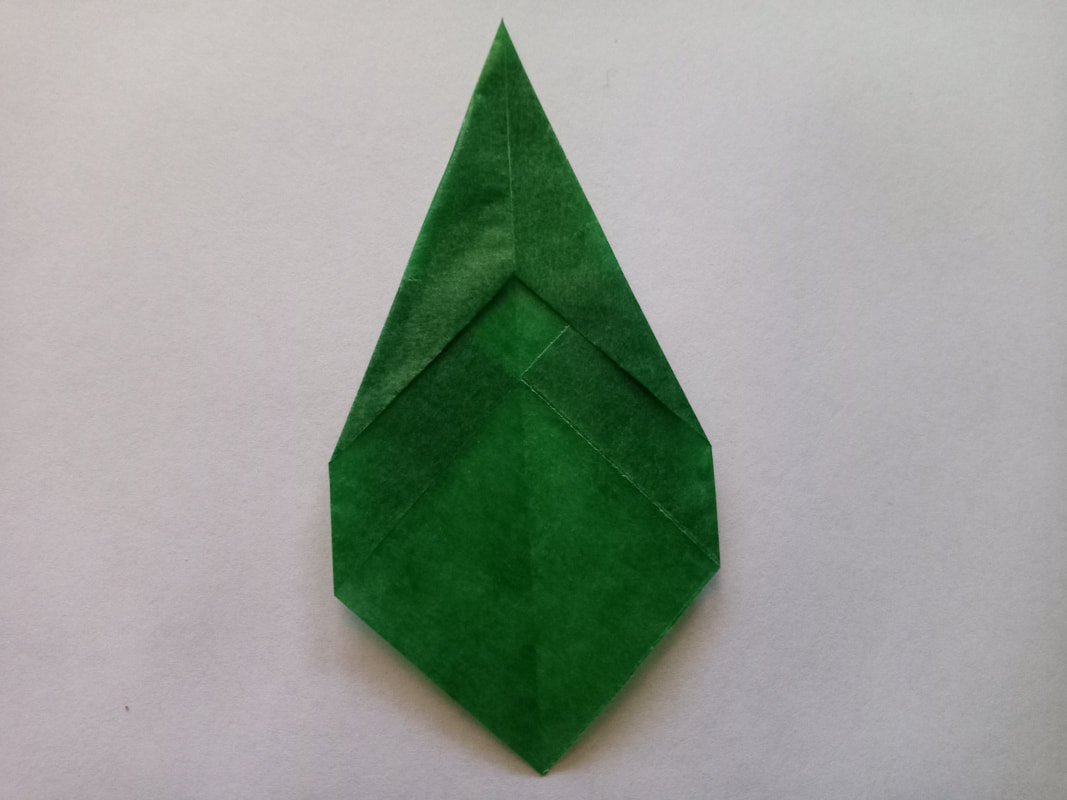 Finally, take the lower right edge of the point and fold so it lies along the center crease. Glue in place. Repeat the above steps with each of your remaining squares. 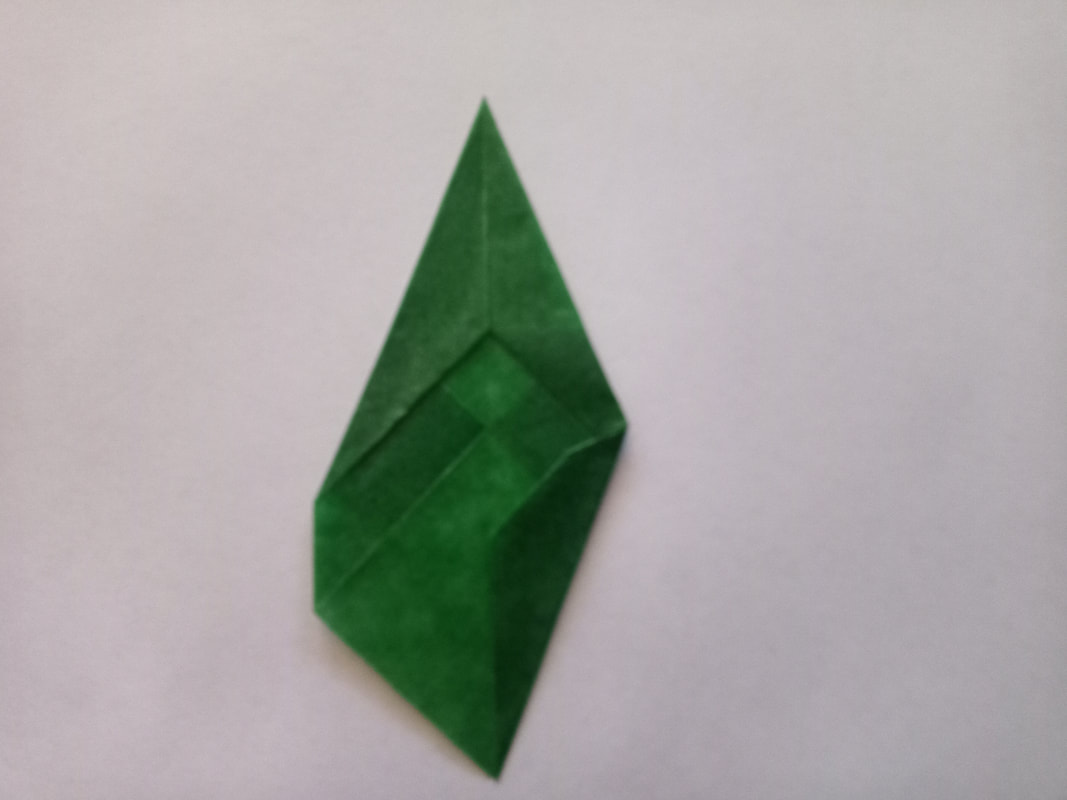 To assemble your suncatcher, begin by aligning and gluing the lower left side of one point on the center crease of a second point, with the bottom corners touching. Continue gluing all the way around until you have used all eight of your folded pieces. The Elmer's Re-Stick glue will allow you to reposition your pieces if needed, making your star more precise. 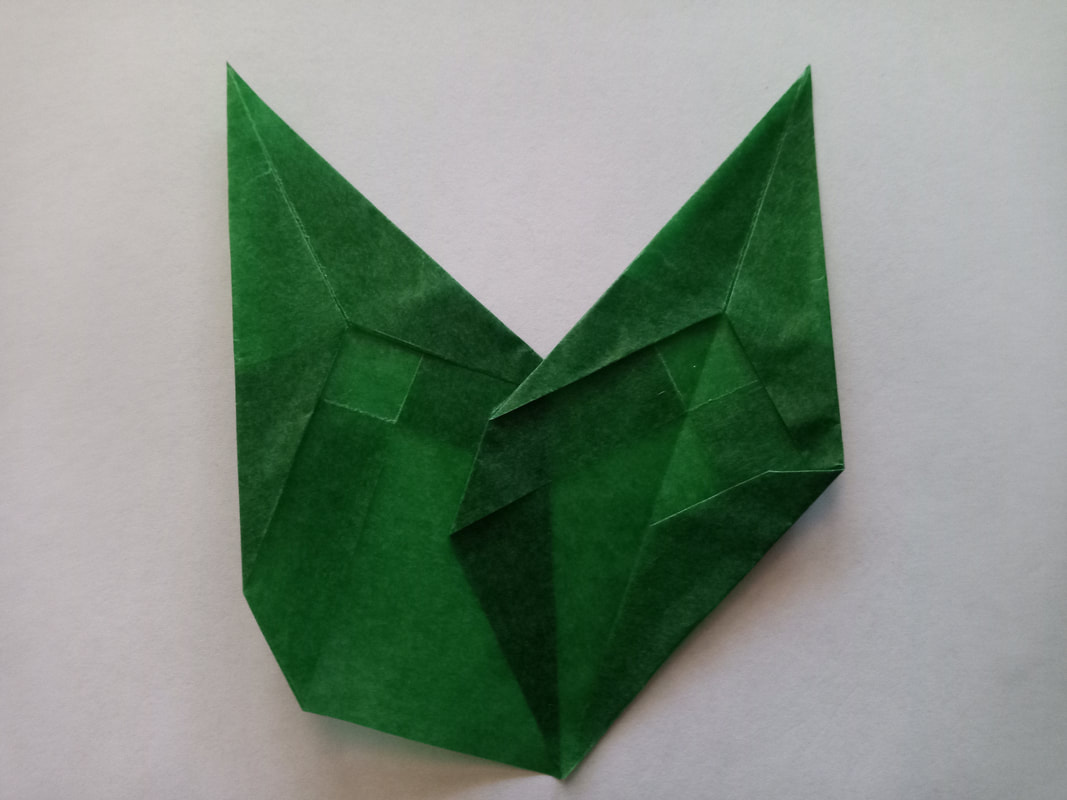 Your suncatcher is now complete! Roll up a small piece of tape and affix it the back of your suncatcher to hang it on your window. These suncatchers look best in dark green, purple, and blue. 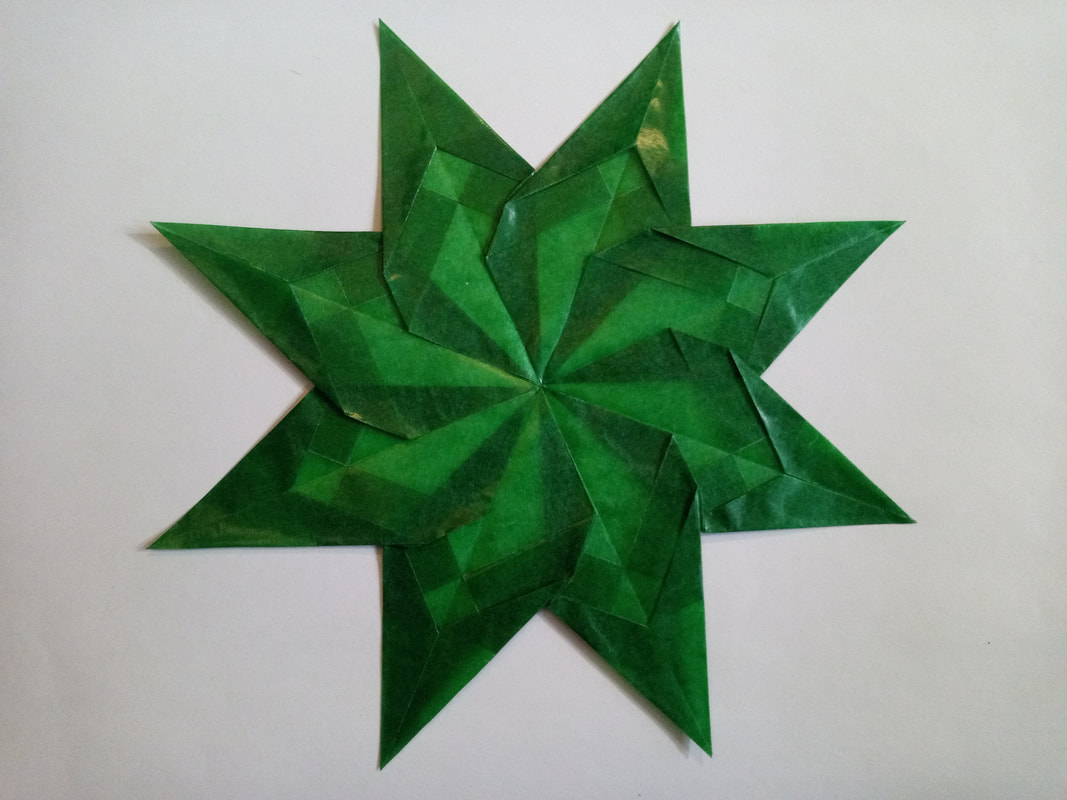 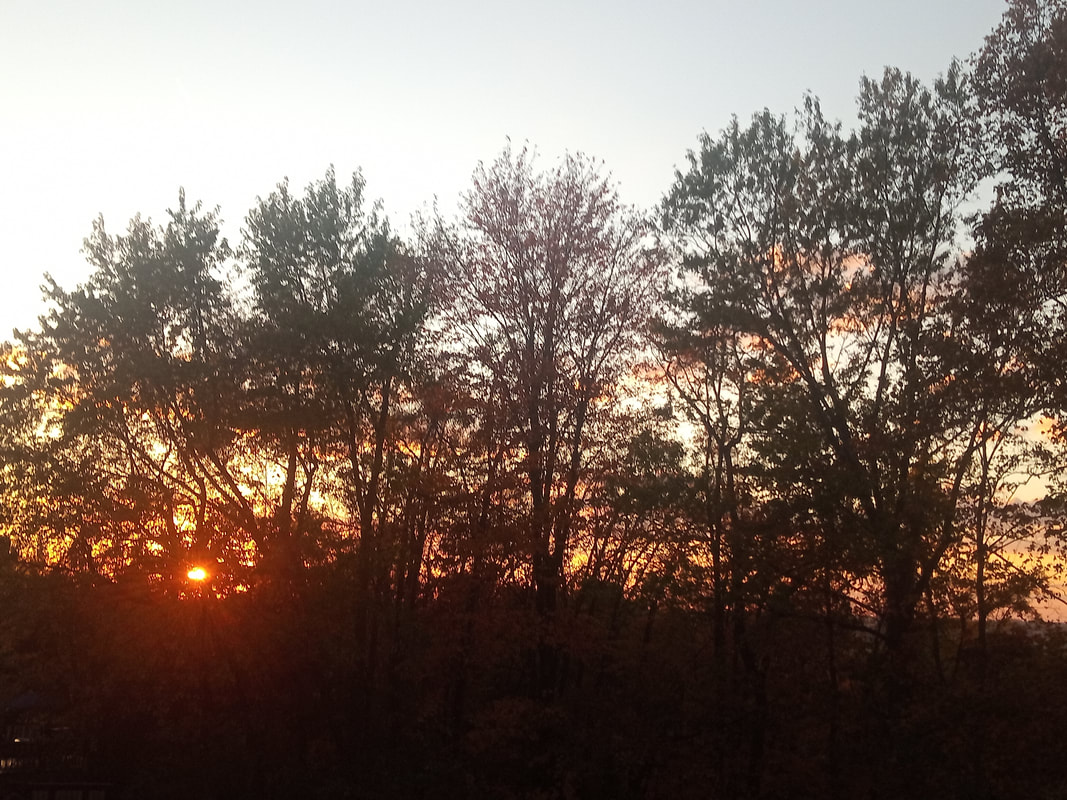 Just days before my fourteenth birthday in May of 2015, the healthy, energetic life I had always known fell apart. Now at age nineteen, I suffer from multiple chronic illnesses, and I have lived the last five-and-a-half years mostly in bed and disabled. This is not the life I expected, but it is the life God has for me, at least for a season. This is not a detour; it is the road, and it leads to somewhere good. When I am discouraged, I remind myself of the biblical story of Joseph in Genesis. If he hadn't been sold into slavery in Egypt, he would never had been able to save the people from famine. I contemplate over Jesus dying on the cross. It was the darkest day in history, and yet we call it Good Friday because by His death, many now have life. I think of Joni Eackson Tada, whose quadriplegia led to her disability ministry. Romans 8:28 teaches “that for those who love God all things work together for good, for those who are called according to his purpose,” and I trust that somehow God will bring good out of my suffering too. In fact, I can already see glimpses of it. My faith is stronger. My relationships with my family and friends are deeper. I marvel at beauty that I used to rush by. I find great joy in what I used to take for granted. I've written encouraging cards and emails I would never have written otherwise. I've had the opportunity to pray with and for others who are hurting. I've taken up blogging on this site. This is not to say pain is good or that it doesn't really hurt. Tim Keller writes, "There’s no saccharine view in the Christian faith. The promise is not that if you love God, good things will happen in your life. The promise is not that if you love God, the bad things really aren’t bad; they’re really good things. The promise is that God will take the bad things, and he’ll work them for good in the totality." Suffering grieves the heart of God, but He has an eternal perspective in mind. He knows my pain is "light" and "momentary" compared to the never ending glory that is coming in heaven because of it. He sees the big picture and knows where the story is headed. This past November, as I sat outside watching the sunset and listening to music, a Steven Curtis Chapman song came on that I'd last heard on the radio before becoming sick. To me, it's even more beautiful now. "I know this is not Anything like you thought The story of your life was gonna be And it feels like the end has started closing in on you But it’s just not true There’s so much of the story that’s still yet to unfold And this is going to be a glorious unfolding Just you wait and see and you will be amazed You’ve just got to believe the story is so far from over So hold on to every promise God has made to us And watch this glorious unfolding" God isn't done with my story yet. I hold onto hope and wait for the glorious unfolding. |